03/17/2021 18,538 Guinea pigs
Author: Olga
In order for your rodent to always feel good, he simply needs his own home, the role of which is played by a cage. Without this, his stay in the apartment will be simply impossible. What kind of cage is needed for a domestic rodent, what should the bottom be like in it and why? How to make a cage for a guinea pig with your own hands? What should be the dimensions of a homemade structure? You will learn about this below.
[Hide]
Cage requirements
Although domestic rodents may seem fat and clumsy at first glance, believe me, they are very fast and sharp. Any guinea pig owner can confirm this - you have to try hard to catch an animal that has run out of its cage. Therefore, the size of the structure where your pet will live is very important, especially if you do not allow him to leave the cage.
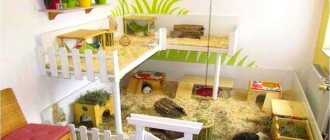
In general, you should understand that the larger the structure, the more comfortable it will be for the pet, which is why a terrarium or enclosure with a large enclosure always remains the most popular. If you decide to make an enclosure on your own, then this is even better - you can select all the necessary dimensions yourself in accordance with the photos and drawings provided below. The size should be such that the pet can be carried into the cage without any problems, holding it in your hands. In addition, regardless of size, the structure must be more than durable, since pigs can chew not only thick cardboard, but also wood without any problems. In addition, animal feces are quickly absorbed into the cardboard, as a result of which such a house will become a breeding ground for bacteria and diseases.
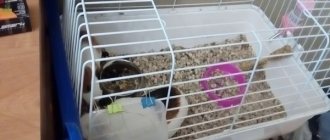
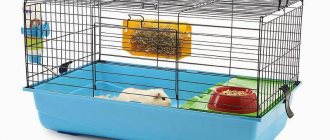
The best option would be a cage with a plastic bottom and the ability to dismantle the upper part. Why the bottom should be plastic is understandable, all because pigs often gnaw at the bottom of the cage. Additionally, if you have a dune cage, this way you can easily clean and disinfect your pig’s house. In general, in any case, exclude wood as an option for making the bottom of the cage. At a minimum, the bottom should be plastic for hygienic reasons.
Where is the best place to put the cage?
The guinea pig's home is placed in a place where there are no drafts. It should also not be located near heating appliances. The minimum acceptable distance is 40–50 cm. The dwelling cannot be placed near external walls; a distance of 20–30 cm is left between them.
Also find out where the name "guinea pig" comes from.
If there are no other pets living in the apartment, the cage does not need to be covered. There should be enough light, but without exposure to aggressive sunlight. This can cause heatstroke in the rodent. It is not advisable to place your home in a room with a TV. Do not forget that these are shy animals. At the same time, they love human company.
Which is better: a homemade or purchased cage?
In this case, it all depends on preferences and financial capabilities. Of course, if money allows, you can buy a terrarium, an enclosure with a pen or a dune. Why?
Because if the terrarium or enclosure with a pen is metal and nickel-plated, then it will:
- have a longer service life;
- hygienically clean;
- prevent exposure to sunlight;
- last longer even with constant treatment with disinfectants.
It should also be noted that the likelihood that a rodent will damage such a cage is much lower. Especially if you decide to purchase a terrarium or an enclosure with a pen. In addition, structures made of organic glass, getinax or other synthetic materials are cleaner from a hygienic point of view. Among other things, they are more resistant to chemical elements. As for combined materials, such structures are not so durable, but they are much easier to make, so their cost is an order of magnitude lower.
In any case, even at home, you can make and arrange a cage in such a way that it will be reliable. Even if your pigs chew on everything, there are plenty of options for making the structure so that it is durable. Below we will look at how to make it yourself.
How to make a house with your own hands?
Of course, you can buy a house for your pet in the store. But if you do it yourself, you will save money and build a spacious and beautiful house for your pet. Clay flower pots, wooden or plywood products are suitable for these purposes.
You can make a house from corrugated cardboard. To do this you will need:
- corrugated cardboard;
- glue (non-toxic);
- stationery knife.
The process of its manufacture consists of the following stages:
- We cut out the walls of the house. Don’t forget to immediately make windows and doors in them.
- We connect the walls.
- Attaching the roof.
- We place the house in the cage. It is better to install the product at the side of the cage.
Building a plywood house would also be an excellent choice. It can be one or two-level, with partitions and windows. In other words, when making it, owners can show a full flight of imagination.
In fact, you can make a house for your pet from any available materials. These can be wooden mansions, a house made of plastic pipes, products made from natural fabric and much more.
Cage Making Guide
So, if a terrarium or a purchased enclosure with a pen does not suit you, then you can always make a house for a rodent on your own. Moreover, if you have good instructions, you can make a large enclosure with a pen, equipped with additional shelving.
Required tools and materials
Prepare in advance:
- corrugated cardboard (quantity depends on the drawing);
- metal grill with small mesh size;
- plastic cable ties;
- adhesive tape;
- knife;
- scissors;
- meter or tape measure;
- pencil.
Drawing up a drawing
Drawing for manufacturing the structure
As you already understand, the size of an enclosure with a pen for an animal should be large, naturally, if space in the apartment allows. Taking this into account, it is necessary to make a corresponding drawing. In fact, there are many options for making an enclosure with a pen, we will consider one of them. A version of the drawing is shown above.
Sorry, there are no surveys available at this time.
Assembly instructions
- In accordance with the drawing, draw the base on the material, in this case corrugated cardboard. It is better to use corrugated cardboard for an enclosure with a pen because it is a multilayer material. Thus, if you cut through only one layer, this material will bend well. The red lines in the drawing mark those places of the first layer that need to be cut, and the black lines indicate what needs to be cut off completely; this can be done using a regular knife. When the cutting process is completed, you should begin assembling the structure; in this case, keep in mind that the protruding edges of the sides must be securely fixed with tape.
- This way you get a rectangular box, the height of the sides will be 15 cm if you make the designs in accordance with our drawing. Of course, the dimensions can be increased if necessary.
- You should install iron bars along the entire perimeter of the future home for the rodent; they should be cut into panels 0.3 m in size. The edges should be processed if necessary and bent in such a way that your pet does not get hurt during close contact. The metal panels themselves should be connected using ties prepared in advance, and they should also be fixed in the middle. All sides must be assembled separately, this is done so that the so-called walls can be adjusted to size.
- Then the lattice elements must be fastened together using ties, and they must be connected at right angles.
- You can also use plywood as a base, but this material will be less durable. As for the arrangement, in this regard, the cage must be equipped with everything necessary, in particular bedding, a drinking bowl, a feeding trough, a hay barn, etc. It all depends on the imagination.
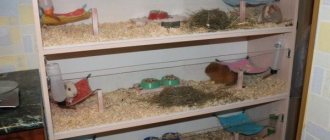
One more point: if you have several rodents, and you do not want to keep them in one cage for certain reasons, then you can use racks. The rack can be small or large, like in pet stores. Racks are convenient because you can house several pigs in one place without taking up much space. But the rack is not so easy to find, and not everyone can make it with their own hands. You will also find photos of the racks below. Actually, the manufacturing procedure itself is not particularly complicated; anyone can handle it.
How to build and equip?
Before you begin the work process, you should make a competent drawing. This drawing should indicate the dimensions of the product and indicate the materials for its manufacture. Next you will need to prepare the necessary materials and tools:
- plywood for making a pallet (you can also use any plastic container as a pallet, for example, a photo tray);
- metal grate. Its cells should be no more than 3 cm for adults, and no more than 1 cm for small piglets;
- furniture nails;
- packaging of plastic cable ties;
- scissors;
- roulette;
- jigsaw;
- pencil.
The height of the base of the product must be at least 15 cm, and the length and width of the structure can be any, but not less than those indicated above.
The production of the cell is carried out in the following sequence:
- Draw on the plywood the shape of the future base of the product, according to the drawing.
- Using a jigsaw, cut out the necessary parts.
- Secure them with furniture nails.
After completing all the steps, you will have a plywood pallet. Assembling a cage for a guinea pig is carried out in the following sequence:
- We take a previously assembled rectangular plywood pallet with 15-centimeter sides.
- At the corners we attach posts made of wooden blocks.
- We cut the metal mesh into panels of the required size.
- We connect the finished panels with the base and posts using slats.
That's the whole simple process of making a cage for guinea pigs with your own hands. Now you need to arrange the interior space for a comfortable and happy life for your pets.
The arrangement of the cage begins with the placement of feeders. Your guinea pig should have three different feeders for:
- hay;
- dry food;
- juicy food.
Hay
Next, we attach the drinking bowl. Drinkers and feeders, as well as hay boxes, can be purchased ready-made at a pet store.
Now you can move on to arranging the play area and recreation. Guinea pigs love houses, hammocks, ladders, mazes, toys and balls. The ladder can be made of metal gratings or wood.
Adviсe
So, what you need to consider:
- The cage must be equipped with everything necessary, otherwise the pet will not feel comfortable.
- For the bottom, use corrugated cardboard, plastic or other durable material that the pig cannot chew through.
- The iron for the grill must be as strong as possible, otherwise your pet will chew through it without any problems.
- Clean the cage regularly to prevent bacteria and disease.
- The cage must be made in such a way that it can be disassembled and washed without any problems; take this into account when assembling.
- The larger the space, the more comfortable the animal is.
- The air temperature in the room where the rodent is kept should be around 22 degrees. It shouldn't be too hot or cold here.
Necessary materials
- Multilayer and dense corrugated cardboard,
- Metal mesh or lattice with a mesh no larger than three centimeters,
- Ordinary plastic cable ties,
- Knife,
- Scotch tape,
- Large and small scissors
- Pencils or markers for marking,
- Ruler.
It is best to use cardboard from large household appliances. It's more durable.
To ensure that the cardboard does not allow moisture to pass through, it must be glued on the inside with tape in two or three layers. Some people prefer to cover the inside with acrylic or even fiberglass. Cardboard is an ideal material - it is light, easy to work with, odorless and harmless, and also easy to find. You should be careful when choosing a metal mesh. The recommended mesh is three centimeters, but if you are keeping a family of pigs and planning to produce offspring, you must choose a mesh with a mesh no larger than a centimeter. Otherwise, the kids will crawl all over the apartment.
Video “Pig Cage”
A version of a large enclosure with a pen for a guinea pig is presented in the video.
Was this article helpful?
Thank you for your opinion!
The article was useful. Please share the information with your friends.
Yes (100.00%)
No
X
Please write what is wrong and leave recommendations on the article
Cancel reply
Rate the benefit of the article: Rate the author ( 7 votes, average: 4.43 out of 5)
Discuss the article:
Pros of a cage made by yourself
A do-it-yourself guinea pig cage, made of thick cardboard and mesh, has many advantages over its store-bought counterpart. This is not only a significant saving of money. This is an opportunity to make a really large cage for a whole family of guinea pigs with several levels, shelters and ladders. A homemade cage can have a different shape and design and fit harmoniously into the interior of an apartment or even a balcony if it is insulated. A bedding made of soft and durable fleece will bring big savings. You don’t need to change it every time—just clean it of debris, rinse it under water if necessary, and put it back. A homemade cage will allow you to add new levels or houses or change the design after some time. You can create a cage in the shape of the letter L, multi-story, vertical - everything is limited only by the imagination of the breeder. From leftover building materials you can make a house for a guinea pig, a nursery for fresh grass or hay, a ladder or a labyrinth. The mesh makes a wonderful and comfortable crib.
Self-made cages are more durable and easier to use, and the animals feel free and happy in them.
You can find different versions of drawings - from the simplest to the most complex, and production will not take much time.
Assembling a structure for guinea pigs
Having found out the required size, you can begin drawing the drawing. First, mark the volume and shape of the pallet on thick cardboard. Add at least 15 cm on each side, connect all the measured points with a line, these will be the sides of the future house.
First, mark the volume and shape of the pallet on thick cardboard
Using a knife, make cuts along the marked fold lines, but do not try to cut all the way through. Cover the top with tape, making sure that no gaps appear.
Bend the cut piece along the lines and fasten the sides with tape to make the structure more durable. Please note that it is better to wrap the outside of the bottom with several layers of adhesive tape, carefully pressing it into the cardboard. Thus, the first part is ready.
Clean the grate until completely smooth. Roll up the frame, securing the edges with a plastic tie, free the tail, which needs to be trimmed. The next step is to install the lattice part into a plywood frame-pallet. Next comes the arrangement of the interior space. Here you will need all your imagination and design ingenuity. Set up a home for rodents, make it cozy and individual.
Believe me, cleaning such a cage will be much more convenient than ready-made options sold in the store. Besides, what could be better than creating and arranging housing for your beloved pet. When will you be able to try yourself in such a role?
Furniture cage
If you have old furniture at home, don’t rush to throw it away! It can also be great for building a pig house.
Display rack
The rack is usually made from a ready-made display case. You can buy it in a store, for example. Or purchase it from those who used it before, but the moment came when it was no longer needed. The display case is made with wooden shelves and varnished so that the animal cannot gnaw them.
Metal rack
A multi-level pig house can be made from a shelving unit. The shelves can be easily removed and adjusted as needed. You can use several racks at once for a multi-tier cage.
One end of the house is covered with plywood, and the other with mesh. The shelves need to be mounted bottom up so that it looks like a pallet.
Bookshelf
You can also make a house for an animal from a bookcase.
To do this you need:
- Attach lattice sides to the shelves.
- Doors are also made of lattice, plastic or wood.
- The floor is made of linoleum.
- As an addition, you can install light and even rooms for pigs.
