The advantages of such housing for guinea pigs
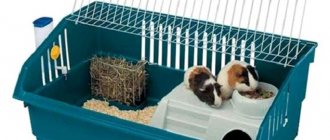
Furry rodent shelving has many different benefits. The structure, like ordinary furniture, is easily matched to the interior. If you focus on the surrounding environment when creating a structure and developing its design, then the pig rack will become a real decoration of the room. Inside such a home there is a place to place everything that a pig needs to be happy:
- privacy shelters;
- feeders and drinkers;
- stairs;
- tunnels, etc.
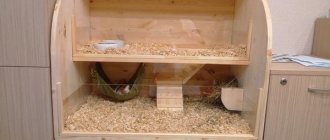
There is no need to make playgrounds separate from the main housing - all attractions and sports equipment can be placed on the same or different levels of the rack. The pig will be able to have fun any time she wants. The presence of several floors allows you to create a multi-room house for the animal with areas for a specific purpose - a bedroom, a dining room, a playroom, etc. Transparent front sides provide a good overview, you can keep an eye on your pet and control where exactly it is and what it is doing.
The dimensions of the rack and, again, its multi-level nature make it possible to accommodate more than one pig in such a house. In this kind of “cottage”, rodents will not fight for territory - there is enough space for everyone. And, if something happens, the neighbors will be able to go to different rooms.
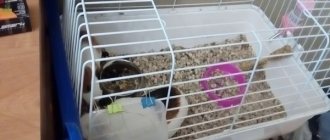
Compared to a regular cage, the shelving design makes much less noise when the pig is getting busy. In addition, through the walls and ceilings of such a structure, debris (particles of bedding, filler, etc.) practically does not get out, unlike the bars of the cage, through which all small elements fly out.
Building effect
We don’t always have free financial resources, but it is necessary to protect our pets. In this case, it is best to roll up your sleeves and build them a cage where they will feel cheerful and secure. This option is suitable for both rabbits and chicks with parrots.
What is the effect of building such a house:
- during the construction of cages, a person takes into account absolutely all factors that can influence the process and final installation (features of the cage, placement in a certain place, what conditions will be there for keeping animals, etc.);
- the financial costs of maintaining a poultry or rabbit farm are significantly reduced;
- Do-it-yourself cell production helps to avoid defects that may occur on a factory-made analogue.
Cage Making Guide
So, if a terrarium or a purchased enclosure with a pen does not suit you, then you can always make a house for a rodent on your own. Moreover, if you have good instructions, you can make a large enclosure with a pen, equipped with additional shelving.
Required tools and materials
- corrugated cardboard (quantity depends on the drawing); metal grill with small mesh size; plastic cable ties; adhesive tape; knife; scissors; meter or tape measure; pencil.
Drawing up a drawing
Drawing for manufacturing the structure
As you already understand, the size of an enclosure with a pen for an animal should be large, naturally, if space in the apartment allows. Taking this into account, it is necessary to make a corresponding drawing. In fact, there are many options for making an enclosure with a pen, we will consider one of them. A version of the drawing is shown above.
Assembly instructions
In accordance with the drawing, draw the base on the material, in this case corrugated cardboard. It is better to use corrugated cardboard for an enclosure with a pen because it is a multilayer material. Thus, if you cut through only one layer, this material will bend well. The red lines in the drawing mark those places of the first layer that need to be cut, and the black lines indicate what needs to be cut off completely; this can be done using a regular knife. When the cutting process is completed, you should begin assembling the structure; in this case, keep in mind that the protruding edges of the sides must be securely fixed with tape. This way you get a rectangular box, the height of the sides will be 15 cm if you make the designs in accordance with our drawing. Of course, the dimensions can be increased if necessary. You should install iron bars along the entire perimeter of the future home for the rodent; they should be cut into panels 0.3 m in size. The edges should be processed if necessary and bent in such a way that your pet does not get hurt during close contact. The metal panels themselves should be connected using ties prepared in advance, and they should also be fixed in the middle. All sides must be assembled separately, this is done so that the so-called walls can be adjusted to size. Then the lattice elements must be fastened together using ties, and they must be connected at right angles. You can also use plywood as a base, but this material will be less durable. As for the arrangement, in this regard, the cage must be equipped with everything necessary, in particular bedding, a drinking bowl, a feeding trough, a hay barn, etc. It all depends on the imagination.
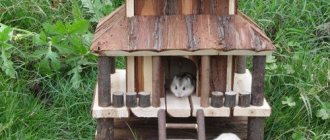
One more point: if you have several rodents, and you do not want to keep them in one cage for certain reasons, then you can use racks. The rack can be small or large, like in pet stores. Racks are convenient because you can house several pigs in one place without taking up much space. But the rack is not so easy to find, and not everyone can make it with their own hands. You will also find photos of the racks below. Actually, the manufacturing procedure itself is not particularly complicated; anyone can handle it.
So, what you need to consider:
The cage must be equipped with everything necessary, otherwise the pet will not feel comfortable. For the bottom, use corrugated cardboard, plastic or other durable material that the pig cannot chew through. The iron for the grill must be as strong as possible, otherwise your pet will chew through it without any problems. Clean the cage regularly to prevent bacteria and disease. The cage must be made in such a way that it can be disassembled and washed without any problems; take this into account when assembling. The larger the space, the more comfortable the animal is. The air temperature in the room where the rodent is kept should be around 22 degrees. It shouldn't be too hot or cold here.
We sew a T-shirt with raglan sleeves
Today I would like to tell you how to sew a T-shirt with raglan sleeves.
For me personally, such a T-shirt is easier to assemble than a regular one. Even in terms of time, I still spend longer with a regular T-shirt than with a raglan one.
- chalk or special marker;
2. Cut out the details of the T-shirt from fabric.
I used two types of fabric. There is an interlock with a zigzag print on the back and front, and a white drawstring on the sleeves. We cut out one front piece, one back piece and two sleeve pieces.
3. Product assembly.
HOW TO SAVE? Shopping at FIX PRICE for guinea pigs / DIY SENNYK lifehack
We pin the sleeves to the back of the product. The pattern shows that the sides of the sleeves (which are attached to the back and front) have different lengths. The longer side of the sleeve is pinned to the back of the T-shirt, the shorter side is pinned to the front. I pin the sleeves to the shelves in one direction. Those who are uncomfortable with teasing can baste them or use a method that is convenient for themselves.
How to sew a hammock for a guinea pig: DIY / SvinkiShow
4. Stitching seams.
Seams can be sewn both on an overlocker and on a regular machine using a zigzag seam. We sew the sleeves all in one direction.
After we have sewn the sleeves, we proceed to the side seams. Just like the shoulder seams, we pin the material with pins, aligning the shoulder seams so that after stitching the underarm seam looks smooth and beautiful.
How to make a house for a guinea pig - choosing material
To prevent the sleeve seam from running away, I tie the tail threads with a regular knot and cut off the excess.
5. Finishing the collar with bias tape.
For me, it’s more convenient to measure bias tape not using a measuring tape (measure the armhole of the neckline, then put this measurement on the tape, etc.), but to measure the tape itself directly on the neckline, slightly stretching it (the tape). After I measured the binding, I add 0.5 cm to the seam and form a ring from it.
After the binding is formed into a ring, fold it in half and pin it to the neck of the product. And we can sew it on an overlocker or a machine.
Having sewn the binding to the neckline, we either iron it or carefully stitch it to the front and sleeves using a machine with a straight stitch.
6. Processing of the bottom and sleeves of the product. End of work.
From the wrong side, fold and iron the hem allowances at the bottom of the product and on the sleeves. Then we sew them either on a flat-stitch machine, or with a double needle or with an elastic seam on a regular machine.
Our T-shirt is ready