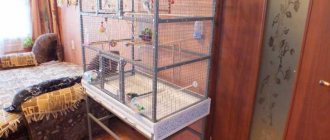
Benefits of homemade cages
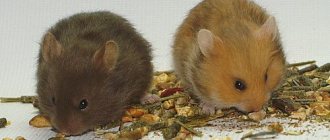
Some owners do not think about the conditions in which guinea pigs will live. For these purposes, someone uses an aquarium in which there is high humidity, or a cage for hamsters, where they will be cramped. Guinea pigs need a spacious and comfortable home, so it’s better to make one yourself .
You can also think through all the nuances in advance to make cleaning as convenient as possible or, if necessary, increase the space
A DIY guinea pig cage has a number of advantages:
- Saving money. Even if you have to buy the missing materials, it will still be much cheaper than a ready-made cage in a pet store. Choice of material. The owner can choose the material from which the house will be made. It must be environmentally friendly and of high quality. You don't need to have any special knowledge or skills. All you need is the right tools and materials. Independent choice of shape and size. The cage does not have to be rectangular. It can be non-standard, multi-level, high or not very high. Before choosing a project, it is important to consider the size of the space in which the cage will be installed. A more spacious one promotes physical activity of the animal, which has a positive effect on its life expectancy. In addition, such a space can easily accommodate various devices (houses, drinking bowls, stairs).
Horizontal connection
Does the space in your apartment allow you to place 2 cells side by side? Then they can be united by fancy tunnels. And if the hamster cottages are also multi-tiered, then it becomes possible to arrange a real amusement park for hamsters!
For this you will need:
- pipes for creating labyrinths, straight or curved;
- adapters from pipes to a square entrance (if the doors are not round);
- insulating tape;
- scissors.
Connect the pipes using special fasteners, giving the tunnel an interesting shape. Try on the tunnels before securing them. The pipes must be securely attached to the entrances. Particular attention should be paid to ensuring that there are no gaps through which the hamster could escape. To do this, you will need adapters, which are sold in pet stores. For greater reliability, the connections should be reinforced with electrical tape.
You can make several labyrinths through which you can get from one cell to another. This will be much more interesting for the fluffies. But please note that at the end of the tunnel there must be a surface on which the pet could stand, and not flop straight to the bottom of its home.
The result will be a design like this:
Some owners go further and combine the two described ideas in one project. That is, first they put several hamster houses on top of each other in 2 columns, and they get two combined cottages. And then they make a horizontal connection using pipes. It also turns out quite original.
Requirements for living conditions
It is not advisable to make multi-level houses for older pigs
When choosing the size of the cage, the characteristics of the room where it will be installed are taken into account. Most often, apartments do not have enough space for a spacious home for guinea pigs. But there are minimum requirements that are recommended to be met.
If a pair was acquired (a boy and a girl), then one should remember about possible offspring. Therefore, the cage size must be designed for 4 or more guinea pigs.
The height of the walls should be at least 40 cm. If the animal stands on its hind legs, it should not reach the top of the wall.
Before designing, it is recommended to take into account other features:
- The place where the house will be installed must be dry, clean and well ventilated. It is advisable for people to gather in this room. Hearing human speech, animals adapt faster. The cage should be installed on a flat surface. If there are other pets living in the apartment, then the guinea pigs need a ceiling. It will protect them from aggression from other animals or fallen objects. The rodents' home should be well lit and away from heat sources. In the room where the guinea pigs will live, the air temperature should be 22 degrees and the air humidity should be 50%. Slight deviation in both directions is allowed. For walls, it is recommended to choose a metal grid. If you use solid material (for example, fiberboard), it will limit the flow of air and natural light. The minimum distance between the gratings should be 1.5 cm, the maximum - 2.5 cm.
If you want to paint the rods, you need to choose a paint that will not harm the health of the guinea pig, since they have a habit of gnawing on various objects.
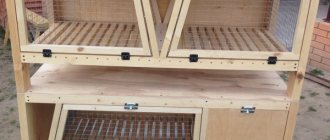
Necessary materials and step-by-step instructions
The following materials will be used to build the house:
Corrugated cardboard. These can be boxes or packaging from household appliances. It is an ideal material for making a cage - it is easy to bend, it is light, durable and inexpensive, and can be cut with a utility knife. Metal grate. You can buy it at the market or at a hardware store. It is not necessary to purchase large lattice panels. You can use small pieces as they will need to be held together with cable ties. A pack of plastic cable ties. Stationery knife. Scotch. Scissors. Ruler or tape measure. Pencil.
The process of creating a guinea pig cage can be divided into several main stages.
Stage 1. Making the base
It is recommended to start construction from the foundation. To do this, you need to perform a number of actions:
Choose the size of the base depending on the number of pets and the size of the room. It is recommended to do this on a single piece of corrugated cardboard. Draw a rectangular base with the given dimensions on cardboard according to the drawing of the guinea pig cage. For the sides, retreat 15 cm on each side. Cut out the resulting sketch with a stationery knife. Carefully cut only the top layer along the base lines. This way, corrugated cardboard will bend easily, since it consists of several layers (dense layers and air pockets). You don’t have to cut through them at all, but then the fold will turn out uneven. Bend the sides and secure with tape. The result should be a rectangular shallow box. To ensure that the base does not allow moisture to pass through, it is recommended to completely cover it with tape. For convenience, it is better to take a wide one.
For reliability, it is better to cover the outside with several circles of adhesive tape.
Stage 2. Assembling the walls
At this stage, metal gratings are used:
Cut the metal gratings to the required length. You can use grids 30-40 cm wide and fasten them with plastic staples. For example, if the width of the house is 80 cm, then you can take two lattice sections of 40 cm each. The height of the walls depends on the number of floors. For a one-story dwelling, a height of 30-50 cm is sufficient. Treat all sharp edges so that pets do not get hurt. Fasten all elements at right angles using cable ties, first checking that the length of opposite sides is the same. Use scissors to trim the ends of the plastic ties.
Stage 3. Combining the box with bars
Now you need to connect the base to the lattice structure. They are simply installed into the base and additionally secured with ties so that they are at the top, bottom and center.
The cage is ready. Now you can think about how to set up a cage for a guinea pig.
The walls should not be pulled too tightly. Otherwise, problems may occur at the opposite end of the cage.
Connecting hamster houses
When combining cells into one house, the location of the doors is of great importance. If apartments have several entrances, this is very convenient; you can combine them in any way. The most common connections are:
- Vertical. One house is placed on top of another, resulting in a two-story cottage (if both squares were single-tiered). The floors are connected by stairs. This is the simplest option for cells that have only an upper entrance.
- Horizontal. The cells stand side by side and are connected through tunnels. A particularly chic design is obtained by combining two multi-tiered cells.
If you have a lot of free time and a lot of plastic bottles, you can build a diagonal connection of several houses. But first, practice on simpler options.
Vertical connection
The easiest option, which will require a minimum amount of materials, namely:
- 2 one-story cells;
- wire or special clamps;
- metal scissors.
Using this method, you can combine 2 identical small cells into a large two-tier one. But an even more interesting option is to connect rooms of different lengths, then you will get a house with an attic!
Making such a design is a simple matter:
- Place the large cage on the floor and open the top entrance.
- Remove the tray from the small cage and put it away (you only need a metal frame).
- Place the small wire box directly above the top entrance to the large one.
- Connect them in this position in several places using special clamps or wire (use metal scissors to cut the wire).
- Make a ladder or slide leading from the first floor to the second.
Well, now you can add a few interior items (shelter, bowl, running wheel, etc.) - and a cozy house with an attic is ready!
Tips from more experienced owners
Building a house for guinea pigs yourself is not difficult. But you should pay attention to the advice of more experienced pet owners:
- At the bottom of the house you can install a plastic tray that cannot be chewed through. Alternatively, 8mm plywood can be cut to fit the base. The home should not have any cracks. For faster adaptation of the rodent, it is recommended to cover 2-3 side walls with thick fabric or cardboard in the first weeks, since guinea pigs are shy. If you plan to take your animal for a walk around the apartment, then during the design process you can think about the door through which it will enter and exit. For a multi-level house, wooden ladders should be covered with thin planks to prevent a rodent from falling.
We offer plastic pallets with sides in Moscow and the Moscow region at an affordable price!
We produce plastic pallets with sides. The sides in such products allow the pallet to be mounted on protruding surfaces and give it a more aesthetic appearance. order plastic pallets with sides in Moscow by calling us or sending a request by email (data in the CONTACTS ). We have our own production of plastic pallets in Moscow and sell pallets throughout Russia. We offer pallets with sides of any size in quantities of 1 piece or more. Pallet production time is from 1 hour. We provide the service of urgent production of pallets.
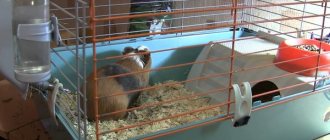
Arrangement of the cage
Do not overcrowd the house with various elements. In order to save more free space, it is recommended to use only the basic elements:
- Feeder. Even if there is only one animal, you should use two feeders - one for hay, the other for the rest of the food. If there are a lot of pigs, then you should provide a sufficient number of feeders so that they do not compete with each other. Drinking bowls. Several of them should also be installed. Drinkers must be purchased. It is not recommended to purchase devices with automated water supply. Rodents will not be able to deal with it and will constantly feel thirsty. Houses. Each pig should have a separate house. There they will sleep and hide, considering themselves safe. Ladders. Necessary if the house has several floors. Game Zone. Here you can install a labyrinth, a hammock, put balls or wooden blocks.
Drinkers and feeders should be in the same area (dining area)
It’s easy to make a homemade cage for a guinea pig, and your pet will be more comfortable in a spacious house. Saving money is an added bonus.