03/17/2021 25,664 Chinchillas
Author: Olga
Every caring chinchilla owner has thought at least once in his life about how to provide his animal with a comfortable stay in the house. After all, a chinchilla’s cage can be small in size, but these rodents need a lot of space. Therefore, many resort to such a solution as a display cage for chinchillas. In this article we will tell you what kind of cage you need and how to make it yourself.
[Hide]
What kind of cage should a chinchilla have?
If you decide to get such an exotic animal for our countries, you must take into account all the parameters so that the animal feels “at ease.” Since any rodent needs a home, it is not at all necessary to run to the pet store and buy the most expensive cage. Even a high-quality design can be made with your own hands. Moreover, you yourself will draw up drawings with the dimensions that you need, and will not buy what is available in the store.
When developing a drawing, you should consider not only the dimensions and how the pet cage will look in your home. Consider the number of rodents. If you have one chinchilla, then think about the future - you may want to happen to another animal, so plan in advance the place in the cage for the offspring. Depending on the design, you can keep from one to several pets in such a display case; the main factor in this case is free space, which should not be small.
Prevention and care of display cases
The manger, feeder and tray should be washed every day. If a litter tray is used for the toilet, it should be changed as soon as it gets dirty. The entire display case is cleaned at least once a week. Before this, the chinchilla is carefully taken out of the house. Subsequently, all items are removed from it. It is more convenient to remove debris with a vacuum cleaner. To wash a glass, you need to prepare a soda solution. Do not use a hard sponge, it will scratch. The floor is thoroughly cleaned and dried. The side walls are cleaned of dust with a damp cloth. The attributes are washed and dried, and only then are they put in place. It is recommended to disinfect your pet's home using a special product. You can buy it at your local pet store.
Sources
- https://DomBai-26.ru/shinshilly/kak-sdelat-vitrinu-dlya.html
- https://zverek.org/vitrina-dlya-shinshill.html
- https://index-uliz.ru/shinshilla/vitrina-dlya-shinshilly-svoimi-rukami.html
- https://vplate.ru/shinshilla/vitrina-svoimi-rukami/
- https://mychinchilla.ru/soderzhanie-uhod/vitrina-dlja-shinshilly-svoimi-rukami.html
- https://homjakam.ru/shinshilla/uhod-i-soderzhanie/vitrina-dlya-shinshilly
- https://homkin.ru/shinshilly/uhod-za-shinshillami/vitrina-svoimi-rukami.html
What should be in a rodent cage?
If the animal is kept in an apartment, then a do-it-yourself chinchilla cage should be 80x80x50 cm in size. At a minimum, a feeder and a drinking bowl should be located here. Feeders with food should be installed firmly so that the rodent does not accidentally turn it over. The same applies to the drinking bowl - it must either have a heavy bottom or be securely fastened. In addition, your pet will also need a mineral or salt stone - they not only contain minerals, but also allow you to grind down the rodent's teeth, which are constantly growing.
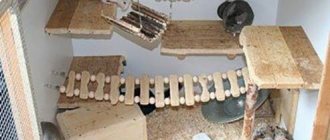
Please also keep in mind that the water in the drinking bowl should always be fresh and clean. In addition to the drinking bowl, you should also install a special tank with sand, because all chinchilla owners know how much these animals love sand baths. It would not be superfluous to install homemade wooden shelves in such an enclosure. They are necessary so that the pet can rest on them. Accordingly, the shelves should be installed at different heights. Also an important component of any cage is the hay box - rodents simply love hay, so it should always be in the display case.
Requirements for the showcase
There are specific requirements for arranging housing for animals. The dimensions of the display case must be no less than:
- length – 80 cm;
- height – 50 cm;
- width – 80 cm.
This area can comfortably accommodate one animal. If you plan to keep two rodents, the area will need to be almost doubled.
Since chinchillas are rodents, and they tend to taste everything, their housing must be made of environmentally friendly and safe materials. An excellent option would be to use natural wood. Also, when maintaining them, it is worth taking into account temperature and humidity. To ensure that the home is well illuminated, special lamps are used.
Attention : before placing the animal in a new home, you must carefully inspect it for sharp corners, otherwise the pet may be injured.
Before moving the animal into the house, it must be equipped with toys, a drinking bowl, feeders, a hay barn, play equipment and a sleeping area.
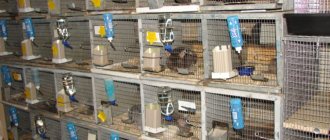
Pros and cons of ready-made cells
Now let's move on to the advantages and disadvantages of a do-it-yourself chinchilla display case. Naturally, today the question of finding such a display cell will not take much time. However, its cost can be steep if it is made of high-quality materials and has everything you need inside. If you decide to purchase an inexpensive design made in China, then, of course, you will save a little money. But in this case there is no point in talking about the quality of the cell.
One of the significant disadvantages of a purchased display cage is that it will be the same as the manufacturer wanted. But if you decide to build and arrange such a showcase on your own, then it all depends on your imagination and budget. You yourself can purchase the material that suits you, you can think over the dimensions and even the original shape if you wish. This way you can create the comfort your chinchilla needs while in the cage.
Sorry, there are no surveys available at this time.
Advantages of a display case for chinchillas
The main advantages of display cases for chinchillas include:
- saving free space. These structures are often placed along the wall, opening up a large space for outdoor games, but take up less space than cages;
- aesthetics. Such structures have a neat appearance and fit harmoniously into the surrounding environment;
- opportunity to watch animals. In such buildings, the facades are made of transparent glass, so it is convenient to observe them;
- low noise level. Unlike cages, display cases are more closed and do not have metal bars that animals love to chew;
- large internal space that allows you to place numerous shelves, racks, ladders and other toys for rodents;
- lack of garbage and efficiency of cleaning. Unlike an open cage, food, hay and other debris that animals often scatter around will not be scattered near the display case.
Showcases must be of a certain size
Master class on making a display cage
So, how to make a display case for a rodent at home? Large display cages are always better than a regular small cage, so we'll tell you how you can make your own. Detailed instructions with photos and videos are presented below.
Tools and materials
Materials you need to prepare:
- the main material for the pallet and walls, you can use laminated chipboard;
- reliable and durable galvanized mesh;
- glass, a reliable option would be if its thickness is about 6 mm;
- in addition to the pallet and walls, you will need boards for arranging shelves;
- tie screws and a corresponding drill for them;
- hinges for doors;
- lock;
- PVC tape, preferably it matches the color of the material from which the cage is made;
- self-tapping screws;
- screwdriver or screwdriver;
- drill;
- jigsaw
Steps
- First of all, you should decide on the size and material from which the display case will be made. In accordance with the drawings, you need to cut the chipboard into appropriate pieces. At the initial stage, you need to cut out the so-called windows in the side walls where the mesh will be installed.
- After this, you need to cut out the required piece from the mesh for these same windows. The resulting pieces should be secured to the walls using self-tapping screws. Please note here that your animal may really like the places where the mesh is attached to the walls and he will sharpen his teeth on them, so it is better to hide the screw heads with aluminum thresholds.
- The next stage in the manufacture of the enclosure will be the fastening of the back and side walls to the pallet, that is, the base. All three walls are placed on a pallet, after which you should drill holes for the tie screws using a drill. Immediately these walls on the pallet need to be fastened together. Then you need to do the following - fasten not only the walls, but also the floor to them, as well as the ceiling.
- In addition to the main enclosure, you will also need a place where all the animal’s things will be stored. According to the photo, the cabinet is installed above the enclosure, and ordinary hinges can be used for fastening. To prevent the door from the cabinet above the enclosure from falling randomly, you can use a limiter.
- Now glass doors should be installed to the main enclosure. They are mounted on special hinges, for installation of which you do not need to drill glass.
- Use the same tie screws to install the shelves on them. You can use other types of fasteners, but we decided to do without it.
- Then all the screw heads should be closed with plugs, and it is advisable to cover the edges of the enclosure with film, it will be more beautiful. Actually, at this point the cell manufacturing process can be considered complete. Place in it a feeder, a drinker and other elements that we talked about earlier. After this, the animal can be moved into its new home. More drawings for various designs can be found below.
The request returned an empty result.
Blueprints
The request returned an empty result.
Where does the rodent live?
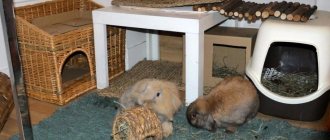
Through experimentation, experts came to the conclusion that the optimal habitat for this rodent would be a special display cage. Such display cases can be found in specialized stores, but if a person who wants to have a chinchilla in the house has certain blacksmithing and carpentry skills, he can save a lot of money by making this place for the future pet to live with his own hands. Let's try to figure out what a showcase is and how it differs from a regular cell?
Imagine your grandmother's sideboard, or rather its upper part. This is a cabinet with doors at the bottom and glass shelves at the top, always behind glass doors that can be made sliding or opening. This top is a showcase. For a chinchilla, the shelves can be made from plywood, and the glass doors can be replaced with fiberglass or something similar, as long as light gets through.
It must be said that a chinchilla will be much more comfortable in a display case than in a cage, and there are many reasons for this.
- The showcase is more spacious than the cage.
- The cage is made of twigs, there is nowhere to hide, and the chinchilla needs a closed den. Showcases are optimally adapted for this purpose - the owner can improvise quite freely with closed areas.
- There is more space in a display case than in a cage, because it can be made to any depth.
- Various natural materials from which the owner can build a display case will suit the rodent more than metal rods. Chinchillas prefer secluded places where they can hide if necessary, and if they are wooden, this is normal.
- A rodent located behind the glass of a display case creates less noise and bothers the owners less.
- It is not difficult to remove it from the display case if there are several doors in the front wall.
- If debris is constantly flying out of the cage through the bars, a solid wall will avoid this unpleasant feature, and will also provide access to each “floor” of the display case; cleaning will not take much time.
- The display case can be “camouflaged” if it is made of materials that match the color of the furniture.
- If you equip the display case with wheels, it can be moved from room to room to create an acceptable temperature regime for the rodent and not overheat it. It should not be forgotten that temperatures above 25 degrees Celsius can cause heatstroke in chinchillas, as these animals originate from the high Andes mountains of the South American continent.
Having come to the conclusion that a showcase will be the most convenient habitat for a chinchilla, it is worth paying attention to the fact that you can make a showcase with your own hands from wood, aluminum profiles and plastic structures. There are a number of requirements for the manufacture of display cases:
- the smallest space for a chinchilla should be at least 800x800x500 mm;
- when keeping more individuals, the size increases and multiplies;
- the materials from which the display case is made must be sufficiently durable and safe, since rodents tend to try them “on their teeth”;
- the display case should be dry, warm, well (but not excessively) lit and have good ventilation;
- During the production process, it is necessary to remove sharp edges and protruding corners of the panels, which can lead to accidental injury to the animal.
We offer you the opportunity to get acquainted with a wooden craft with your own hands. This is one of the most important requirements for display cases of this type, so that the animal does not feel cramped. Chinchillas require at least 0.4 m2 per person. In addition, this area does not depend on either the length or the width of the display case: both can be changed at will or in accordance with the size of the apartment.
Why is it often recommended to use old cabinet frames as a base? The point is practicality and ease of remodeling: you will have to put in a minimum of effort to turn it into a showcase. Although a certain danger to the animal may lie precisely in the material from which the wardrobe is made.
Here are step-by-step instructions for assembling a cabinet display cabinet.
- We remove the doors.
- If there are shelves, cut holes in them. Chinchillas will need this to transition between tiers.
- If there are no shelves, there is room for imagination - the shelves can be placed in any order.
- The material for the shelves must be natural wood, since chinchillas prefer to “try” horizontal surfaces: gnawing on a vertical wall is less comfortable.
- It will be necessary to make ventilation holes in the upper part of the mobile case so that air masses can circulate freely inside the display case.
- Don't forget to cover these holes with wire mesh - this chinchilla won't even try to chew.
- The removed doors are replaced with a metal mesh stretched over the frame, or made of transparent material. Most experts recommend networking.
- To carry out work on the manufacture of such a frame, it is recommended to take the same removed “original” doors and replace the panels with a mesh, leaving an outer door frame about 100 mm wide for attaching the mesh.
- It’s very good if the cabinet design initially included lower drawers. This will make the conversion even less energy-intensive: only in the next step will you have to remove the floor of the main part of the cabinet and replace it with a fine mesh, under which it is easy to place a container where excrement and debris will fall. This will make the cleaning process much easier.
Video “DIY Showcase”
To learn how to make a display cage with your own hands, watch the video.
Was this article helpful?
Thank you for your opinion!
The article was useful. Please share the information with your friends.
Yes (50.00%)
No (50.00%)
X
Please write what is wrong and leave recommendations on the article
Cancel reply
Rate the benefit of the article: Rate the author ( 9 votes, average: 4.78 out of 5)
Discuss the article:
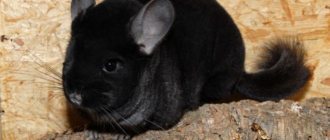
Is a chinchilla more than just a fur coat?
This is a very peaceful and tactile animal, which not only never bites, but on the contrary can sit in the owner’s arms for a very long time, and, like a tactile maniac, “absorb” the affection of its owner in the form of stroking and sniffing.
Chinchillas come in several varieties:
- small long-tailed;
- coastal;
- short-tailed;
- big.
In the wild, they all live in rocky, arid regions, at altitudes ranging from 400 to 5,000 meters. They choose rock crevices or space under stones as shelters.
In the absence of these, they dig their own minks. In their natural habitat they feed on various herbaceous plants, mosses, lichens, cacti, shrubs and tree bark. They can eat insects from animal food.
Aluminum profile for display cases - beautiful commercial equipment of any shape
Using an aluminum profile, you can make almost any store display. The simplicity of the design allows you to assemble it yourself.
Is it possible to manufacture and install a glass showcase in a retail space with limited space? Without involving welding work? Fast? By collecting it on site? Using wooden or MDF furniture for these purposes is quite impractical, since in such rooms high humidity is normal, which leads to rapid failure of cabinets. What to do? Is it possible to solve this problem by using shelves and exhibition stands made from aluminum profiles for display cases?
Step-by-step instructions for assembling a glass display case
The glass cube type design is the most common option for a retail space. To assemble it, you must follow the following steps:
- To begin with, a sketch is prepared. Based on the finished sketch, it will be possible not only to focus on the number of parts, but also on the dimensions of the finished structure. When assembling, it is best to use a frame and connectors. If necessary, they can be easily replaced with new ones.
- Using a connector, you need to connect a pair of equal pieces of glass by simply inserting them into the gaps.
- After this, the angle between the installed glasses must be measured. In this case, a protractor will come in handy to help determine how evenly the glass is installed. If successful, the angle will be 90 degrees. If necessary, the glass is leveled.
- For strong fixation, glue is used (it is optimal to use silicone).
- After applying the glue, you must wait at least a couple of hours for the glue to dry properly. Next, similar steps should be performed until the structure grows to the required size. Each time, the junction of the glass and the profile should be firmly fixed with glue. It will add strength and reliability to the entire structure, making it almost all-glass.
- If desired, at this stage, individual sections are finished with doors and LED strips.
- In order for the structure to have a finished look, it is necessary to use bases. When choosing a material, it is important that the base is in harmony with the entire finished structure. We recommend using polycarbonate or chipboard sheets. These are flexible and easy-to-process materials. Regardless of the final choice, the base needs sanding and painting.
- The choice of color depends on the color scheme of the sales area, but you can also use standard black, which is not for nothing considered universal (it is optimal for any atmosphere).
- To provide greater stability, the base should be wider than the finished display case. It must be installed directly in the center. The structure itself is first generously lubricated with glue to provide stability.