Hamsters, leading a very active lifestyle and mainly at night, certainly cause trouble for their owners, preventing them from sleeping soundly at night. If you are faced with similar problems, then it’s time to give your pet a silent exercise machine that will help him splash out energy and not disturb your sleep. Follow the simple instructions on how to make your own hamster wheel at home, so your pet can lead a quiet but active night life.
Why do you need a trainer?
Hamsters, by nature, are nocturnal rodents.
Under natural conditions, animals run long distances in order to feed themselves. Hamsters kept at home are deprived of this opportunity. In addition, there is simply no particular need to independently search for and obtain food, since timely and sufficient feeding of the pet is provided by its owner. But despite favorable conditions and satiety, hamsters still need to periodically receive physical activity. This is necessary not only to entertain the animal, but also to maintain the health of its cardiovascular system. Regular physical activity stimulates the rodent's metabolism and metabolism, helping to keep the muscular system in good shape.
And in a small cage, you need to give the hamster the opportunity to move, because it is not safe to let him roam freely. Due to its small size, the animal is not very visible and can be accidentally injured. But other pets can also be dangerous for hamsters: cats, dogs, large parrots.
A convenient and safe solution to this problem is to install a running wheel directly in your pet’s home. Hamsters quickly understand how to use it, and if they want, they can climb onto the simulator and run around at any time.
The only drawback is that the hamster is a nocturnal animal. That is, its activity in most cases occurs at the time of day when we are used to sleeping. Therefore, active night runs can disturb apartment dwellers if the wheel squeaks or makes a knocking sound.
Possible problems
Even using such a simple design can cause difficulties. Most often, hamsters refuse to run in a wheel. It also happens that over time the wheel begins to squeak.
The wheel squeaks
The structure may creak as a result of prolonged use. The parts deform over time and come into contact with each other during rotation. The solution is to lubricate the surfaces with oil. If a new wheel squeaks a lot, it may be defective.
Hamster doesn't run on a wheel
This problem can occur for several reasons:
- The rodent doesn't like the wheel. Try replacing it with a machine made of a different material or with a different design.
- The hamster has a hard time turning the wheel. This may happen due to the age of the animal. Rodents older than 2-3 years are considered old and they lose the desire to move a lot.
- The hamster has an injury. It may also happen that the rodent injured its paw or hit itself. Find out by watching him. If he used to be cheerful and active, but suddenly suddenly stopped running and playing, you should take him to the vet.
Training a hamster to use a running wheel
If this is your pet hamster's first time spinning the wheel, you will need to help him use the wheel correctly. You can place your pet's favorite food in the drum and repeat this process several times. The treat should always be placed at different levels so that the animal tries to get to it and understands the principle of the drum’s operation. Another training method is to close the exits from the wheel, which will force the animal to move around the simulator in order to get out of it.
After a short period of time, your pet will definitely get used to it and will spend time with great pleasure on its new favorite exercise machine, which you made with your own hands.
Hamster toys
Hamsters in nature are forced to spend a lot of time searching for food and fleeing from predators.
They don't have time for special games. In captivity, animals often become overweight due to their conditions: small cages and insufficient equipment. Therefore, in order to create ideal conditions for animals, it is necessary to properly equip the cage and fill their leisure time with special devices. Since it is unwise to put hamsters in danger by having a predator, toys should work in two directions:
- searching for food;
- physical activity.
For the first, grass balls in which a treat is buried, various types of sandboxes and structures with seeds inside are suitable.
Is it possible to make them yourself?
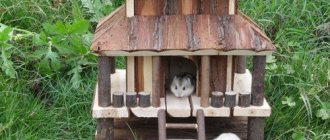
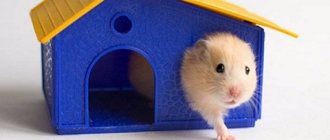
You can make tunnels and labyrinths yourself. The simplest, one might say, budget option for such a hole is a construction made of cardboard. Of course, it cannot be used constantly; sooner or later, it will have to be renewed or replaced altogether. Due to the availability of the material, this is actually not critical.
In addition, making a cardboard tunnel with your own hands is a wonderful joint activity for adults and small family members. There are no limits to children's imagination; adults only need to correct their work, imperceptibly correct it and direct it towards creating a cozy mink that is truly acceptable for pets. Children eagerly decorate the building
It is important to ensure that you do not use decorations that are dangerous for rodents, such as rhinestones, and you will also have to exclude some adhesives
The main advantage of such a homemade labyrinth will be its uniqueness. With some experience, you can create replaceable modules that can be periodically replaced or rearranged; this will eliminate habituation, and the pet will constantly explore the proposed structure, which will bring him great pleasure.
The material for creating the labyrinth will be boxes made of thick cardboard, for example, shoe boxes. The set of necessary tools is not so wide: scissors, ruler, compass, pencil, glue or tape.
The largest box can become the basis of a labyrinth. You can draw a plan on its inner surface. The side walls will become its walls. Various kinds of partitions are made from the material of smaller boxes; passages in the form of round holes need to be arranged in them at different but accessible levels for the animal. Inside individual “rooms” various ladders, cubes, and dead-end chambers can be arranged.
The boxes can be combined with tubes, such as toilet paper rolls. Thus, a structure with various passages and chambers can be created in which the pet can spend several hours a day.
Craftsmen build tunnels and labyrinths even from plastic bottles. However, this material has a significant drawback - it is very slippery. Rodent claws cannot cling to a plastic surface, so it is better to combine bottles with a cardboard or plywood base. Bottles can be cut in half and mounted on a rougher surface. If a multi-level hole is not intended, the bottles can be securely connected using tape. One of the undeniable advantages of such a labyrinth is transparency.
PVC plumbing pipes offer the widest scope for imagination and at the same time reliable execution; a wide variety of connections will allow you to create masterpiece structures. It is necessary to make small holes in the walls of such tunnels for ventilation. The tightness of their connections can cause discomfort for rodents.
The basic rules for creating artificial labyrinths are quite simple, there are not many of them.
- Moderation. Overloading the elements of the labyrinth will quickly tire the explorer and he will lose interest.
- Safety. The use of toxic adhesives is unacceptable. The hamster will definitely try out the labyrinth design. It is also advisable to protect it from contact with tape.
- Availability for observation. The animal, while in the maze, should not disappear from the owner’s field of vision. All its movements must be observable, and the owner must always imagine where the pet is currently located. Some hamsters are prone to escape, it can be difficult to get them back, and in the process of being “AWOL” they are exposed to serious dangers.
To learn how to make a tunnel for a hamster from plastic bottles, see below.
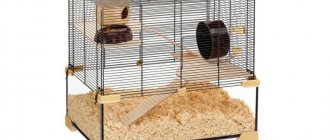
Requirements
The main criteria when choosing a cage are its comfort and safety for your pet. In addition, the future home of a furry friend should be comfortable for its owner. The owner needs to select in advance the place where the new home will be located, and also select a product for a certain size, no less than the minimum recommended for a dzhungarik.
The materials from which the cage is made must not only be durable and strong, but also safe. Rodents taste everything they see, so the grill bars they try should not be harmful to the health of the animal.
Choose a cage that is easier to clean. It is more convenient to buy a product with a pallet. Be sure to check that the door closes well.
Djungarians are very curious creatures, prone to escape, and a weak locking device may not withstand its sharp teeth. Try to buy a home with built-in attributes in advance. This will be a more economical option, and in the future you won’t have to think about where and how best to install all the additional devices.
Materials
Pet stores offer several options for hamster cages.
Made of metal rods. A good ventilated home in which the rodent feels quite comfortable. The inconvenience is that the noise the hamster makes can be clearly heard through the bars, and dirt always forms around. Filler and debris easily penetrate through the bars. The grill itself should be made of high-quality solid metal.
Do not take products made of copper or aluminum - the animal gnaws everything, so it will quickly render such rods unusable.
Plastic or glass aquarium. In such a closed home, the noise level is significantly reduced, and there is almost no garbage. In addition, this is the safest option for a home where there are cats - it is unlikely that a predator will get to the rodent, which is kept in an aquarium under a breathable mesh. However, the hamster himself will be uncomfortable in such a home, since it does not allow air to pass through well.
The inconvenience for the owner is that the aquarium is difficult to clean.
Lattice cage with plastic tray. This is the most preferred option. This cage is easy to clean. If the home is two-level, and the “floor” of the second floor is made in the form of a lattice, then check whether the pet is injured by getting its paws or abdomen stuck between the bars. If the risk of injury is high, cover the second level with cardboard.
It is recommended to buy cages in which the second floor is made of plastic and reinforced with high quality. Try to avoid wooden elements in the cage, as wood absorbs unpleasant odors and also becomes a favorite material for grinding down the rodent's incisors.
Designs and sizes
The length of the cage for one dwarf hamster should be at least 50 cm. This is even longer than for a Syrian hamster. And although the Syrian is larger in size than the Djungarian, the miniature pet still has to run a greater distance per day, so it needs a more spacious cage. If the cage is purchased without additional equipment, then do not forget that the area will be reduced due to the established mandatory attributes.
Another important point when choosing a cage is the gap between the rods. It should be no more than 10 mm.
Give preference to a cage with horizontal bars - rodents like this shape more, and it is much easier to attach additional devices to a horizontal grid for a comfortable life for a rodent.
If the distance between the rods is greater, the hamster will definitely try to escape. And even if the cage contains a fairly well-fed individual, this factor does not deprive it of its plasticity.
If you purchase a very spacious cage, then do not forget that cleaning the hamster is done quite often, and the large dimensions of the cage will significantly complicate this process.
However, if the owner keeps several hamsters at once and plans to breed them, then it is better to opt for a large cage. It is worth mentioning separately about the day of the dwelling. It can be with a retractable mechanism or high. A retractable bottom is much more convenient in terms of cleaning, but a cage with a high bottom is suitable for breeders, since the high sides will prevent curious little hamsters from falling out of the cage.
Step-by-step instruction
There are actually quite a lot of options. We will try to analyze the simplest and at the same time effective of them. The upcoming work is not classified as difficult, and even a schoolchild can cope with it.
- Tin can and hard drive
You will need a regular tin can, preferably one liter canned food, as well as a damaged hard drive from your computer. First you need to remove the spindle from the disk - to do this, unscrew all the screws, remove the board, and then disconnect the spindle itself - it will act as a rotating element.
Now we take the can and apply markings on it so that the width of the future wheel is approximately 5-7 centimeters. Next, use metal scissors to carefully cut off the excess part.
You can make a hamster wheel from a tin can
The next stage is connecting the spindle to the can blank. To do this, you need to glue it to the bottom of the wheel. For this, use high-quality, preferably industrial glue, and not some PVA, as this will not give any result. Then you need to glue the fabric to ensure the noiselessness of the unit. It is better to bend the edges of the upholstery from the outside, fixing them with the same glue.
The final stage is attaching the finished wheel to the cage. You can use wire for this, but the best option is several bolts with washers and nuts. In the second case, you will need to make corresponding holes in the wheel wall.
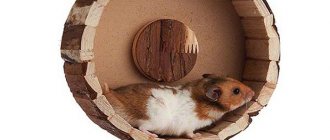
- Wooden wheel
It is more difficult to make, but it is not only reliable, but also beautiful. It goes without saying that, in addition to a set of tools, you will also need carpenter skills. The wheel is made from separate blanks in the form of ordinary sticks. The frame for the structure must be made of bendable wood so that it can be bent into a sphere. You can also make a frame from wire - it will take much less time.
The wooden wheel looks quite nice
The slats must be placed at the same distance from each other, or at least make sure that this distance is not too large. This is a long job, but the result will please not only your pet, but also you.
- Cardboard
This is the simplest option, however, and the least durable. Even a schoolchild can cope with this task. True, there are also certain nuances here that must be taken into account.
Take two pieces of thick cardboard and cut out two round blanks from it. On one of them make a large round hole, on the second - several triangular cutouts and one round cutout in the center. We also make the path out of cardboard. The cut pieces must be of such a size as to fit into the previously prepared triangles. After this, we connect the entire structure using high-quality paper glue. The next step is installing the bushing. It can be purchased in a store or removed from some household mechanism, for example, a bicycle (preferably for children). The sleeve is initially securely attached to the wall of the cage, after which a cardboard structure is put on it.
The process of creating a wheel from cardboard
The advantages of this design are that it is very cheap and can be made relatively easily and quickly. However, there are also disadvantages - first of all, the hamster will definitely chew it (this is the reason why you cannot use painted cardboard), so such a wheel will not last very long.
Cardboard
If you find out how much it costs to buy a trainer and decide that it’s not affordable for you, you need to make the toy yourself at home. The best wheels are made from cardboard; they are convenient for training your hamster. This design is safe and does not creak.
So let's start assembling. To build the toy, we will need to make two circles from cardboard, the size of which corresponds to the parameters of your pet. On one of the circles we cut out a passage for the hamster. Next, in a circle, we make small notches in the form of triangles along the edges. We will also cut out the wall and base to which the circle will be attached. The path should be cut in accordance with the rectangular cut-outs on the circles.
Assembling the cardboard structure:
- we insert the track so that the protrusions on it intertwine with the holes made;
- secure the base to the wall;
- insert the metal sleeve;
- We take the bushing and put one wheel on it, and then the second.
The main disadvantage of this method is that cardboard is short-lived and can be eaten by animals. Advantages: low cost and ease of preparation at home.
Types of simulator and mounts
Running wheels differ in their inner surface. It can be solid, lattice or mesh. It is safest to choose wheels without holes so that the hamster's paw cannot fall into it.
Wheels also differ in the type of fastening:
- to the cell wall. Saves space in the hamster's home, but when used it knocks on the rods or board.
- To the bottom of the cage. Such exercise machines are unstable and can tip over if the rodent starts to run.
- On a stand. The best option for hamsters if space in the cage is not limited. Very stable and causes minimal noise.
Cardboard
This simulator is very budget-friendly, but not durable. In addition, the hamster can chew on it significantly during a break between runs. Anyone can make such a wheel, even without special skills.
Silent
Many people choose this type of exercise machine because hamsters love to run at night. The noise from the rotation of the wheel can be heard all night and interfere with sleep.
Thanks to the special design, the parts do not touch each other and do not create extraneous sounds. But it is worth noting that such wheels are much more expensive than regular ones.
Wood
A wooden treadmill keeps the environment around the rodent environmentally friendly. This is a big plus for his health. These wheels are a little more expensive than regular ones, but you can make them yourself.
Features of the structure of the running wheel
Any running wheel consists of a cylinder, which is mounted on an axle.
When choosing a simulator, it is important to ensure that it rotates evenly and does not deviate to the sides. The wheel stand must be stable
Otherwise it will turn over.
How often should the cage be washed?
Regular cleaning guarantees a healthy atmosphere inside the cage and the absence of extraneous unpleasant odors. Contaminated litter in the tray is cleaned daily.
The time for “general” cleaning is once every 2 weeks. Major cleaning consists of successive stages.
- Place the dwarf in a temporary home.
- Discard all filler from the tray. Leave a small handful of the contents so that the hamster's smell does not disappear.
- Throw away rotten food from your hamster's supplies. It is impossible to clean out the entire “pantry”, since the loss of savings will result in severe stress for the dzhungarik.
- Wash the tray with warm water. Use baby soap and animal shampoos as detergent. Do not use cleaning products with an aggressive composition (white, powder).
- Use a sponge soaked in soapy water to treat the rods. Wipe all attributes and accessories with a dry cloth.
- Wait until completely dry. Pour in new filler and mix it with a handful of old.
- Letting the dwarf into his clean home.
What should a good running wheel look like?
The requirements for selecting a place for an animal are to comply with the following recommendations:
Hamsters are afraid of drafts. They do not like places that are too hot or cold. Dampness. It is not recommended to place the cage on the floor or windowsill. It is important to place the cage in a smoke-free room.
The bottom of the cage must be covered with dry wood sawdust. The hamster should be kept active by placing it in a cage:
- Climbing ropes.
- Swedish wall.
- Running wheel.
- Labyrinths.
These devices will help your pet meet its motor needs, which will help prolong its life and improve its health.
Tips for use
Naturally, there is nothing complicated or incomprehensible in such a piece of furniture for a hamster . But it’s worth listening to some recommendations.
- Do not remove the wheel from the cage. The rodent needs access to it at any time.
- Baby hamsters do not immediately understand why they need this device in the house. At first, you should put a treat inside the toy. When getting to the provisions, the baby will put the simulator into action.
- Don't forget to wash your wheel regularly. Once every two weeks is enough for this procedure.
How to make a silent attraction yourself?
Since the hamster is a nocturnal animal, the peak of energy occurs in the dark, when the owners are already sleeping peacefully. At this moment, the fluffy is running in a wheel, creating a rumbling noise that can disturb an insensitive sleep.
Therefore, many rodent owners are wondering how to make a silent hamster wheel with their own hands. Let's figure it out together.
Let's prepare a round plastic tray or box for storing discs. You will also need a dowel with a curved screw and an awl. Then everything is elementary. We make a hole in the center of the base into which the smooth end of the screw will fit. Using an awl, we make through punctures in the running area so that the fluffy’s paws do not slip. We insert a curved screw into the dowel from the outside between the rods so that the fastener rests against the cage, and from the inside of the hamster’s apartment we put a plastic blank on the metal part.
Wood
If you have the talent of a carpenter, then you can make a wooden product with your own hands. A circle made of such material has a greater range of uses. The deal of a wooden attraction is very clear, it is similar in every way to a cardboard assembly. If desired, you can decorate the product: beautifully intertwine with vine or willow.
The most important thing is to ensure the safety of the hamster and not to build an attraction with a small number of planks. After assembly, the simulator will require care and proper use.
- If you hear that the walking wheel in your cage is squeaking, you should lubricate it from a bottle of machine oil.
- For safety reasons, the simulator is located in a cage or a huge box.
- At first, the hamsters do not understand the purpose of the attraction. To quickly accustom rodents to training, they should be lured with something tasty during training.
- Wash the wheel 3 times a month.
As you can see, making a wheel for a restless hamster with your own hands is not difficult. The main thing is to show a little imagination and patience. Please your pet, and he will be grateful to you for the leisure time provided.
slonvkvartire.ru
A little about ferrets
Recently, more and more often animal lovers choose a ferret as a pet. This animal is very funny, cute and to some extent exotic. And this choice is quite logical. Firstly, ferrets are very cheerful creatures, you won’t get bored with them, there is no end in sight to the games and fun. Secondly, the ferrets are very compact, for some this is a significant advantage, since they can be very easily transported on various trips.
Ferrets, despite the fact that they are nocturnal animals, can quite easily adapt to the life rhythm of their owner. There is no need for daily walks with these animals, like, for example, with dogs. If you decide to take your ferret for a walk, getting him accustomed to a harness won’t cause much trouble. They treat the owner friendly, get used to it well, unlike cats, but without fanaticism, like dogs. It is also worth noting that ferrets are distinguished by their extraordinary inquisitiveness of mind, intelligence and cunning.
Among representatives of the same species, you can find animals with completely different manifestations of character, therefore, you can choose a more suitable type for yourself, from super active to calmer.
Buying running wheels - what to consider?
It is good to purchase a trainer together with your pet. This will save, firstly, from mistakes in choosing the wheel size, and secondly, you will see how comfortable your animal is in it. You will appreciate the size of the feet and cells on the treadmills. You need to balance the rodent and the size of the path. You will immediately understand whether your furry pet likes the new toy. And, of course, evaluate his safety on the treadmill - does he fall, does his paws get stuck, does he stumble, and so on.
When choosing an active toy, choose a comfortable and spacious running wheel for your small pet, with a protected surface that prevents injury.
A more durable option, of course, is metal structures with a good running surface.
The pricing policy for treadmills ranges from 100 to 3000 rubles. Please note that cheaper treadmills wear out quickly. There are many good quality running wheels available at reasonable prices.
There are a wide variety of companies that manufacture treadmills for pet rodents. Toys for pets are popular, including running wheels for hamsters, the following, “Ferplast”, “Trixie”, “Beeztees”, “Darell”.
In addition to the fact that there are many types of treadmills for rodents in stores, you can make such a wheel yourself.
Some owners make running wheels for hamsters and connect a generator to it. While running, the hamster spins the exercise machine and generates electricity. Of course, it cannot illuminate your entire home, but an active rodent will be able to charge a mobile phone.
Buy a wheel for your hamster and you will be sure that he will live an energetic and fulfilling life!
Manufacturing
Before you start making an attraction for your pet, you should at least understand in general terms what a jogging wheel should look like.
- The attraction must be of suitable size. The animal should not be cramped inside, otherwise it will not be able to move comfortably. Excessively large dimensions of the running structure are also undesirable. It will be very difficult for a hamster to spin such a wheel with its paws. For an adult Djungarian hamster, a diameter of 14-16 cm is suitable. For animals of the Syrian breed, it is better to make the attraction larger, since they are larger. For an adult, the diameter of the circle should be at least 20 cm.
- The width of the treadmill also matters. If it is not wide enough, the hamster will periodically fall and may get injured. For small and medium-sized individuals, it is better to make a simulator 5 cm wide. For larger breeds, a track width of 7-8 cm is recommended.
- The running wheel should spin easily. Otherwise, the animal will quickly get tired and may lose interest in its attraction.
- It is worth taking care that the pet does not injure its paws during exercise. This directly depends on the material and structure of the treadmill surface. If you decide to use mesh materials, then make sure that the cells are as small as possible. Otherwise, the hamster's paw may get stuck in them while running. And also, the simulator should not have sharp jagged edges or bumps that the hamster could trip over.
- The treadmill inside the wheel should not be slippery. Therefore, a smooth plastic surface should be covered with thick cloth in advance. The pet will be able to cling to it with its claws.
- When installing the wheel, you should ensure that it is securely fastened. The animal moves quite intensely on the track, and the shaky structure can topple while it runs. Therefore, the treadmill must be attached to the bars of the cage or placed on a strong and stable support.
From plastic bottles
Required materials: a large round plastic bottle, a nail, a dowel with a diameter of 1 cm, a strip of thick fabric.
Step-by-step instruction:
- measure 7-8 cm from the bottom of the bottle and cut it at this level;
- Make a hole in the center of the bottom of the cut container and insert the head of the prepared nail into it;
- insert the nail into the dowel;
- Cover the slippery surface of the bottle with a thick cloth;
- Attach the homemade wheel to the cage bars using a dowel.
A simple cardboard option
To make it, you need to prepare a strong knitting needle, a sheet of thick cardboard, glue, a ruler, and scissors.
The work progress includes several steps.
- Using a compass, draw two identical circles on cardboard and cut them out. They will serve as walls on both sides of the path.
- Make 2-3 square or round windows on the circles with scissors. Their dimensions should be slightly larger than the size of your pet. Through these holes the hamster will be able to get inside his running wheel.
- From the remaining cardboard, cut out a long strip 5-7 cm wide. This will be the attraction track.
- Glue a strip of cardboard between the two circles. Let the glue dry and hold the parts together well.
- Determine the center of the circle and pierce both walls with a knitting needle in this place.
- The resulting wheel can be placed on a support or attached to the wall of a house or cage using flexible wire.
From a tin container
To make a simulator you will need: a cylinder from a computer system disk (hard drive), a tin can of the required diameter, glue for metal, flexible wire, a file, a piece of fabric material.
Making a running ride:
- the first thing to do is to remove the metal cylinder from the faulty hard drive; to do this, open the disk cover and carefully remove the part;
- Cut the tin container at a distance of 6-7 cm from the bottom, file the edges.
- cut a strip of fabric along the width and length of the treadmill and cover the inside surface of the tin container with it;
- to make the design as silent as possible, you can glue a circle of fabric to the bottom of the jar;
- take a metal cylinder from a hard drive and glue it exactly in the center of the round wall of the wheel;
- Once the parts are firmly connected, the running wheel can be secured to the bars of the cage.
Watch a video on how to make a hamster wheel with your own hands below.
https://youtube.com/watch?v=b_nohA6tcUc
Varieties
Modern hamster wheels come in a wide variety. Many people make this accessory themselves. In any case, you should initially familiarize yourself with the design options in order to make or choose the best option. So, let's take a closer look at the types of hamster wheels depending on several criteria.
To size
Wheel dimensions play a big role. If you purchase a small wheel, the hamster will have to sag when running, which will negatively affect the animal’s posture and may even result in injury. The very large accessory is quite difficult to rotate, so the hamster may even refuse to use it.
If you need an accessory for a Djungarian hamster, you should take a wheel with a diameter of 12 to 16 cm. But for a Syrian hamster it is better to take a wheel with a diameter of 18 to 20 cm
It is worth paying attention to the width of the accessory, because a small width will lead to the animal constantly falling out of it. So, for Syrian hamsters the ideal width is 7 cm, but for dwarf representatives - 5 cm
If the gap between the accessory mount and its rotating part is less than 1 cm, then there is a high probability of injury to the animal. If the wheel dimensions are chosen incorrectly, you can expect dislocations and fractures.
Based on materials
This attraction can be made from several materials.
Natural wood. The safest is a wooden wheel, but, unfortunately, it is characterized by the highest cost. If the hamster wants to taste the simulator, then nothing bad will happen.
For example, a plastic wheel presented on a metal stand will be an excellent choice, because plastic parts are characterized by lightness and noiselessness, and a metal stand guarantees the power and reliability of the entire structure.
It is also worth paying attention when choosing a treadmill. It should be non-slip, especially if you consider a model made of plastic or wood
It will be uncomfortable for the hamster to run, and at high speed he may simply fly out. If the mesh is made of metal, you should give preference to a fine-mesh one, because the animal’s paw can fall into a large mesh.
By mounting method
Depending on the mounting method, there are three types of hamster wheels.
- On the wall of the cage. In this case, special holders or strong wire will be required, depending on the type of cage. Using this fastening method, you can save space, but it is worth remembering that this option involves tapping on the hamster’s house itself while running. The option of mounting on bearings is often used.
- To the bottom of the cage. This wheel is presented on a special stand. This is what guarantees the safety of using the product. The stand must be secured to the bottom of the cage. The disadvantage of such fasteners is that the structure cannot be called reliable and safe.
- Standalone device. The wheel is mounted on a stand, so installing it will not be a problem. This option allows you to minimize the possibility of the wheel tipping over.
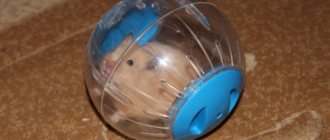
In addition, it is worth noting the running disc. This option is additionally equipped with a stand, which gives it stability, since the hamster cannot fall out of the structure. When choosing types of construction, you can also mention a walking ball.
Step-by-step instructions: how to make a labyrinth?
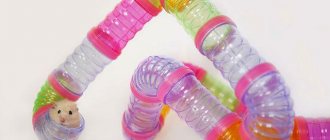
From plastic bottles
Now we’ll learn how to make a maze for a hamster with your own hands from plastic bottles. As it turns out, they can be used to make a whole gallery of multi-level tunnels. The configuration of the labyrinth can be simple, or with dead ends, and even multi-level. For the simplest play structure with 2 knees you will need 3 plastic bottles. Conventionally, they can be designated as:
- Entrance corridor.
- Passage corridor.
- Dead end.
You need to wash the bottles and remove the stickers from them. Cut off the bottom of the inlet bottle. Through this hole the hamster will enter the maze from his cage. The cut line should be free of notches and burrs. Cover the cut with electrical tape or tape so that the sharp edges do not injure the nimble animal.
In the part of the bottle where the narrowing towards the neck begins, 2 holes are cut out opposite each other with scissors: a small hole with a diameter slightly larger than the cap and a large one, almost equal to the diameter of the bottle. To cut a circle, first use a knife to make a cross-shaped slot into which you can easily insert scissors.
In the tapering part of the second - passage - bottle, make a round hole smaller than the diameter of the bottle. Cover the edges of all cuts with tape or tape.
Insert a pass-through bottle through the large hole so that the cap comes out the other side. The parts should form the letter “G” or, in other words, a knee. In the same way, neck to neck, attach the third bottle - a dead end.
If you want your hamster to have a treat at the end of the maze, make a hole at the top of the dead end where you can insert a funnel and pour treats through it for your pet. A homemade funnel can be the cut off neck of a bottle with the cap unscrewed. The connections of the parts are firmly fixed with tape.
Made of wood and plywood
A portable labyrinth is constructed from wood and plywood. For this you will need:
- Planks.
- Plywood.
- Glue.
- Wood saw.
The base can be cut out of plywood. If a plastic box is chosen as the basis for the labyrinth, then it is better to sprinkle the bottom of the labyrinth with sawdust or sand so that the animal does not slip. The height of the walls of the base should be sufficient to prevent the hamster from climbing outside.
- Make the base of the labyrinth - the floor and outer walls.
- Place the boards inside so that they form an intricate labyrinth.
- Cut holes in some walls for a through passage.
- Glue the planks to the floor and base walls with glue.
- Make some of the galleries covered - rodents love dark holes.
- Allow the structure to dry from the glue.
From cardboard
The labyrinth is made from cardboard in the same way as from planks. The parts of the product are cut out with scissors and attached to the base with tape.
Shoe boxes, toothpaste boxes, etc. are used to make interior walls. Place them inside a large base, cut random passages of an interesting configuration in the walls. Glue with glue or tape.
From toilet paper rolls or paper towels
Rolls of toilet paper and paper towels make interesting tunnels. Such tunnels are located between boxes inside the structure, making it more similar to a hamster's home in a natural environment. Paper sleeves are attached with tape or glue.
From a children's construction set
You can make a labyrinth of any complexity using a children's construction set. Build a playground with bridges, galleries and obstacles. Add a staircase and a second floor. Don't forget to design a compartment where your pet will have a treat.
From plumbing pipes
Plumbing pipes can be used both as separate tunnels inside the box and as material for the manufacture of an entire structure. This is a durable material that even has factory connections - fittings. Make a structure of any complexity from pipes. Make small holes for ventilation in the product.
Therefore, ventilation can be made in the form of longitudinal slits or a series of small holes in the pipes. This way you will have windows for observing the little traveler.
A ready-made hamster cage with a labyrinth will save you from the need to regularly walk your pet. Such products are sold in stores, or equip the cage yourself with a tunnel made of durable material. Please note that a hamster is capable of chewing even the most durable plastic of factory products. Therefore, regularly check the integrity of the structure.
A few ideas
All hamsters love to have fun on rides. We'll tell you how to do some of them. Especially small animals like to ride down the slide, run up the stairs and explore the labyrinths. We will start with them.
Slide
Although hamsters are cowards, many of them willingly roll down the slide. Learn tips on how to make a hamster slide and make your pet's dream come true!
The best materials for making this attraction are plastic and wood. But the wooden surface must be thoroughly polished, otherwise the hamster will not slide on the slide, and it can also cause splinters on its paws. Here are ideas for creating this thing:
- Straight slide made of wood. Do you have a small smooth piece of wood? The required length is about 20 cm, and the width is 10. Just place it at an angle of 30º to the floor - and you can roll the fluffy one. This is a temporary structure designed for playing with your pet outside the cage.
- A slide of ducks. If your kids have utiki (short skis), they are ideal for playing with your pet. One ski should be taped to any support, with the rounded toe pointing down, it will ensure a smooth landing on the floor.
- Old toys. Many children have doll water parks at home. They will willingly share the slide with the hamster, because playing with the animal is more fun than with soulless toys.
- Shampoo bottle. If you have cylindrical cosmetic bottles left, cut off both ends and cut the bottle lengthwise into 2 parts. Make a ladder with a support from wood. You can also prepare a landing site. Then all that remains is to install half the bottle and roll your furry friend.
In the latter case, it is not necessary to use a bottle - this is rather an option for the Syrians. For small dwarfs, you can build a PVC slide using the outer shell of a garden hose. This is what it will look like:
Ladder
The pet will climb up the stairs to the second floor of the cage, which can also be used to create an obstacle course. It can be straight or curved. You can make the following types of ladders for your hamster with your own hands:
- From sushi sticks. The supporting slats are made from long sticks, and the short crossbars are glued to them.
- Ladder-ladder. It is very easy to do: transverse slats are glued onto a solid wooden plank to act as steps.
- Made from twigs and wire. You need to select branches with a diameter of 1 cm and alternately connect them at both ends with wire. This staircase is good because it easily turns into a bridge!
- From a broken running wheel. Cheap wheels often break, but they can be given a second life! To do this, carefully cut off the back wall with a knife. You will get a circle with slats. Now simply open the wheel by making 2 cuts on the circles. The resulting ladder can be given an interesting shape, because cheap plastic bends well.
A ladder made from a running wheel can also be used as a bridge or element of an obstacle course.
Peculiarities
The Syrian hamster is one of the most common representatives among rodents, which is usually kept at home. The animal has certain characteristics that should be discussed in more detail.
First of all, veterinarians and biologists highlight such an unusual characteristic of the Syrian hamster as a changed number of toes: there are 4 on the front legs, and 5 on the hind legs
In addition, it is important to note that rodents of this species often have aesthetically pleasing fur, which is traditionally colored golden. Hamsters can also be beige, black, brown, etc.
d. Moreover, the color can be either uniform (consisting of one color) or include several tones and halftones at once.
Among other things, another unusual characteristic of the Syrian breed of rodents is the length of their coat. Thus, short-haired, long-haired and even smooth-haired individuals are distinguished. Moreover, females have much shorter fur than males.
The birthplace of this animal is considered to be Syria (where the name of the breed comes from). Later, the hamster was brought to Great Britain, and from there it spread throughout the world, including our country.
If we talk about the biological characteristics of a rodent, it is important to note that its body length usually does not exceed 12 centimeters in the wild and 20 centimeters at home. Weight varies depending on the sex of the rodent: females can weigh up to 140 grams, and the weight of males, in turn, usually does not exceed 125 grams
However, there are exceptions, the weight of which reaches 200 grams.
What is a hamster wheel for?
Hamsters need movement as much as they need food or rest. In the wild, these animals run around a lot, getting their food. When stocking up, hamsters constantly hide food. But these supplies need to be replenished every day, so the animals again set off on a difficult journey that requires speed and dexterity. A domestic hamster living in a cage is driven by these instincts to run.
Pet rodents need exercise, otherwise their health will deteriorate.
For your information! A small rodent has to run away from larger predators, so the hamster is able to develop great speed. During the night, a wild rodent runs approximately 9–12 km. In a wheel, a hamster runs at a speed of 2–3.5 km/h, although in the wild it can accelerate to 5 km/h.
These animals are nocturnal: they sleep during the day and come out at night to get food. A pet hamster will run in a wheel at night. Thanks to this activity, your pet will always feel good.
The attraction must be durable, comfortable and silent
How to train a rodent to run
Some hamsters don't understand why they need a wheel until they try to run in it. Others become lazy over time and don't want to move much. Experts recommend using the following tricks:
- Lure with a treat. You won't give your hamster a choice if you put food directly into the drum. You need to do this for several days in a row until the rodent itself begins to come and climb into the wheel.
- Blocking the exit. Take a piece of cardboard or a piece of wood and cover the entrance to the wheel with it when the hamster gets into it. He will only have to move in one direction, causing the wheel to rotate.
From plastic bottles
It’s worth saying right away that building a maze for a hamster from plastic bottles is more difficult than from a construction set - here a child cannot do without the help of an adult.
To work, you will need a sharp utility knife and plastic bottles. Their number can be either half a dozen or fifty. The more bottles, the longer and more interesting the labyrinth you can build.
If a hamster can be released into the labyrinths described above only under the supervision of the owner, then he can spend whole days in the bottle labyrinth. Perhaps he will be no less comfortable here than in his usual cage. And there will be much more space for physical exercise. True, a large labyrinth will take up quite a lot of space - also take this into account when starting work.
Having a sufficient amount of material, you can begin construction:
- Take two bottles. In one of them, on opposite walls, make two holes - a large one and a small one. One should correspond to the diameter of the bottle neck, and the second should correspond to the diameter of the bottle.
- Also make a hole near the neck of the second bottle so that the hamster can easily crawl through. Carefully process the edges - there should be no burrs or sharp surfaces here so that the rodent does not get injured during play.
- From the second bottle, unscrew the cap and insert the neck through the large hole, and then through the small one.
- Replace the cap of the second bottle.
Now you have a short maze consisting of two bottles. A hamster placed in one of them will be able to freely make its way into the second; all that remains is to lengthen the labyrinth to the size that seems optimal to you.
When making a labyrinth from plastic bottles, do not forget to make at least several holes in each bottle - it is best to use a thick awl or a hot nail here. Thanks to these holes, the air will be renewed, and your hamster will definitely not suffocate during his morning run.
You can create several spacious areas in the maze using five-liter water bottles. Place a small wheel in one, equip a drinking bowl and feeder in another, a house in the third, and so on. As a result, you will get not just a homemade maze for your hamster, but a full-fledged house with a treadmill.
Tips and tricks
In addition to the basic rules for building a hamster cage, there are additional recommendations that are no less important:
- The materials used must first be thoroughly washed, disinfected and cleaned of excess - stickers, paint residues.
- Before starting work, you need to think about the structure of the cage: plan the toilet, feeding areas, a free part for games and physical training, as well as a place for the hamster to sleep and rest. All basic things should fit inside, and large structures such as labyrinths can be brought outside.
- All parts must be firmly secured. It is better not to use small fragments or place them on the outside of the home - in a place inaccessible to the hamster.
- The cage must be made in such a way that its design does not interfere with regular cleaning. You can make it partially removable, which is especially important for multi-level houses.
- A lightweight house made of plastic or bottles can be used as a carrier.
- For large and heavy housing, it is worth making additional reinforcements between the main part and the pallet. Under heavy weight, the sides of the bottom may become deformed, causing the cage to fall.
- Locks must close doors securely.
- When constructing the cage, it is allowed to use glue, but all parts must dry before moving the pet. It takes about a week for complete drying.
- Hamster cages should be placed on a flat, stable surface, such as a low table. The house can be placed in the corner of the room or on an insulated balcony.
- When making a house, you can use a ready-made frame - an unnecessary cabinet or cabinet.
Making a hamster cage with your own hands will require some effort and construction skills. Such a house will not only be cheaper than a purchased one, but will also meet the technical requirements and personal ideas of the owners about an ideal home for pet rodents.
Wheel made from a plastic bottle
Many owners think that the best manufacturing option is a wheel made from a plastic bottle. In fact, it all depends on the size of the hamster. If we are talking about a baby that exhibits a high degree of activity, a cut-off plastic bottle can actually be used as a temporary wheel. For an adult animal, such an accessory is not suitable, since the rodent will have to take an unnatural position while running.
Most likely, after spending several hours of time, you will be disappointed, because the hamster will run in the wheel 1-2 times and lose interest.
Alternatively, you can use 3-5 liter plastic containers. In this case, the problem with the size of the wheel is solved, but a new one appears - by cutting the plastic container to the required height, you will deprive it of its rigidity and the wheel will turn out to be unstable.
What you need to do it yourself
To make a homemade wheel you will need:
- wooden board as a base;
- stick as an axis;
- compass;
- sandpaper;
- ruler;
- hacksaw;
- stationery knife;
- pencil;
- scissors;
- perforator;
- materials for the wheel body (wooden sticks, cardboard, metal or plastic container, wire).
Important! Small children cannot use cutting objects on their own, so you need to call your parents for help.
What materials are best to make it from?
You can make a wheel from many available materials:
- Tree. Wooden wheels are made from small boards. Ice cream sticks are perfect for this purpose. You will also need a rectangular wooden beam and metal wire. Such a wheel turns out to be durable and requires virtually no financial costs. But if it is not weighted down from below, then it can turn over while running, since it weighs very little.
- Tin can or disk. To make it you will need a tin can of the required size, a screwdriver, a knife for cutting metal, a glue gun, and wire. The design is also quite durable. But if the edges of the jar are not treated, the hamster may cut himself on them. In addition, this design does not look very aesthetically pleasing.
- Cardboard. This wheel is suitable for small rodents, as it is not durable. The design is very simple to make; even a child can do it under the supervision of an adult. Be sure to choose a thick cardboard so that it does not sag under the weight of the hamster.
Have you decided to make a wheel from natural materials?
Silent wheel with bearing
Almost all owners who tried to make a hamster wheel on their own experienced unpleasant consequences. The wheels attached to the axle are very noisy while driving. Even purchased accessories become loose over time and begin to creak and make noise.
The silent bearing wheel is an excellent and very durable alternative. Using a bearing, you can make a hamster wheel from scratch or remake a purchased accessory that has begun to make noise while moving.
Bearing from roller skates or scooter
To make or upgrade a hamster wheel, you can use a roller or scooter bearing. Before use, it is important to ensure that the bearing is in good condition. If the bearing has already been used, it needs to be cleaned or washed. Afterwards, you need to rotate the bearing in absolute silence. If you hear squeaking, whistling or other extraneous sounds, this bearing will not fit.
The bearing is of a suitable size, must be pre-lubricated and secured to the rear wall of the wheel. Before gluing the bearing to the back wall, it must be equipped with wire ears, since such an accessory can only be suspended.
Bearing from an old hard drive or DVD/CD
One of the most interesting and at the same time time-consuming ways to make a hamster wheel. If you want your pet to be able to play with the wheel at any time without disturbing the household, you will need a bearing from an old hard drive or DVD/CD.
The method is a little unexpected, but now we will figure it out in order. So, you will need:
- Old style hard drive.
- A small Phillips screwdriver to remove the hard drive cover.
- A large round container from which the wheel itself will be made.
- Scissors or a knife, depending on the material from which the container is made.
- Glue gun.
Tools and materials for creating a wheel
DIY dog harness: step-by-step instructions
Crafts for hamsters are made from a variety of materials using simple tools:
- wide round plastic bottle;
- scissors;
- nails;
- thick fabric;
- plywood;
- dowel with a diameter of 1 cm;
- cylinder from a computer disk (hard drive);
- metal cutting scissors or file;
- universal glue for metal;
- wire;
- bamboo wallpaper;
- swing bearing;
- drill;
- jigsaw;
- hammer;
- compass, ruler and pencil.
These tools and materials will help you create a structure with suitable parameters and securely fasten it.
Tools and materials for work